In this guide, we’ll look at how to install and configure a DHCP server on Ubuntu 22.04. The DHCP server is essential for automatically managing the allocation of IP addresses in a network. This process is important for simplifying network management and optimizing connectivity between different devices. This tutorial will guide you through the steps required to set up an efficient and reliable DHCP server on Ubuntu 22.04.
Step 1: Ubuntu System Update
Before installing a DHCP server on Ubuntu 22.04, it’s essential to start by updating the system.
This ensures that you have the latest software versions and security patches.
Here’s how to update your system.
Before updating packages, Ubuntu needs to know the latest versions available. Enter the following commands in the terminal:
sudo apt update & sudo apt upgradeThese commands will download and install the latest versions of the packages installed on your system.
Step 2: Install DHCP server
Once your Ubuntu 22.04 system is up to date, the next step is to install the DHCP server software. On Ubuntu, the most commonly used DHCP server is the ISC DHCP server.
Here’s how to install it.
Type the following command in the terminal to install the DHCP server:
sudo apt install isc-dhcp-serverThis command downloads and installs the ISC DHCP server from the official Ubuntu repositories.
Step 3: Configure DHCP server
After installing the ISC DHCP server on Ubuntu 22.04, the next step is to configure the server to distribute IP addresses to devices on your network.
Here’s how to configure your DHCP server.
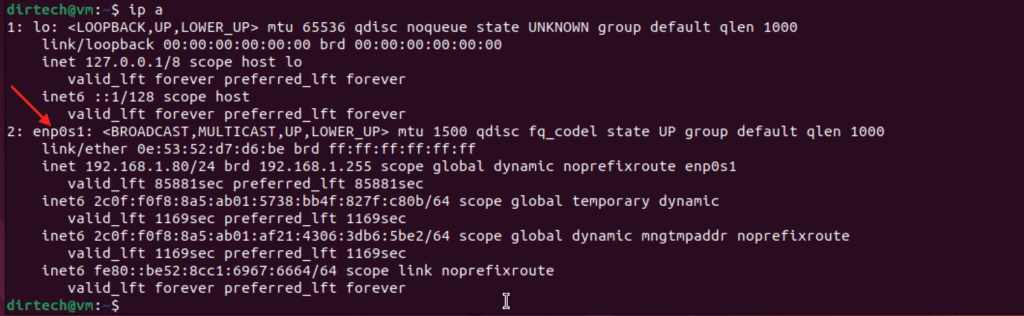
Identify your Network Interface: Find the network interface you wish to use for DHCP distribution (e.g. eth0, ens33). You can use the ip a command to list your network interfaces.
Configure DHCP Server to Use Chosen Interface: Edit the /etc/default/isc-dhcp-server file to specify the network interface.
sudo nano /etc/default/isc-dhcp-serverIn this file, add or modify the following line to define the interface:
INTERFACESv4="interface_name"Configure DHCP Settings
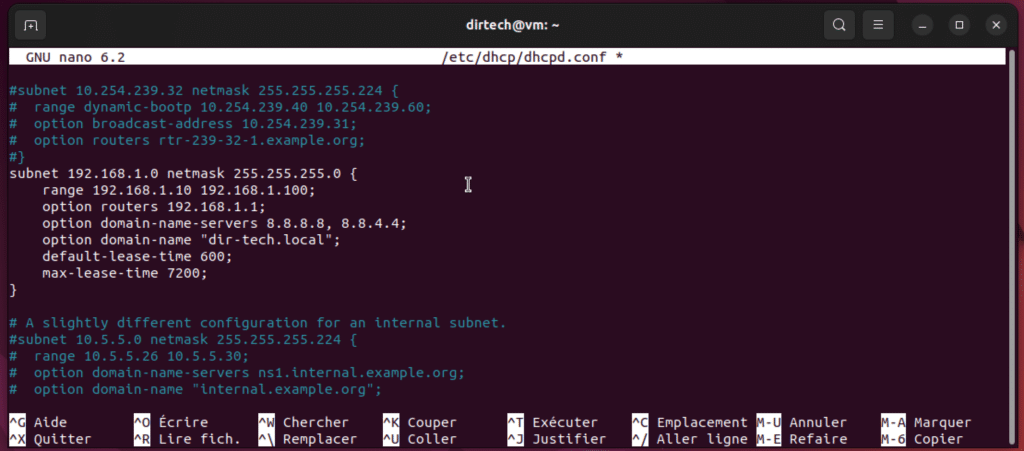
Edit the DHCP Configuration File: Open the main DHCP configuration file (dhcpd.conf) to define your IP address ranges and other options.
sudo nano /etc/dhcp/dhcpd.confAdd your Network Settings: In this file, you can configure IP address ranges, gateways, DNS servers, etc. For example:
subnet 192.168.1.0 netmask 255.255.255.0 {
    range 192.168.1.10 192.168.1.100;
    option routers 192.168.1.1;
    option domain-name-servers 8.8.8.8, 8.8.4.4;
    option domain-name "dir-tech.local";
    default-lease-time 600;
    max-lease-time 7200;
}
Adapt these settings to your network configuration.
Once you’ve made your changes, save the file and close the editor.
Step 4: Starting and testing the DHCP server
Once you’ve set up your DHCP server on Ubuntu 22.04, it’s important to start the service and test its functionality to make sure it’s correctly distributing IP addresses to devices on your network.
Restart the DHCP Service: To activate the configuration changes and start the service, use the following command in your terminal:
sudo systemctl restart isc-dhcp-serverCheck Service Status: To ensure that the DHCP server is operating correctly, check its status with :
sudo systemctl status isc-dhcp-serverThis command displays the current status of the DHCP service. Look for indications that the service is active and running without errors.

Step 5: DHCP server test
Connect a client device to the network: To test the DHCP server, connect a client device (such as a laptop, smartphone or tablet) to your network.
Check IP address assignment: On the client device, check whether an IP address is automatically assigned by the DHCP server. Depending on the device, this information can usually be found in the network settings.
Check DHCP Configuration Matching: Make sure that the IP address, default gateway and assigned DNS information match those configured in the dhcpd.conf file.
Troubleshooting
In case of problems, check the DHCP server logs for clues as to what might be going wrong. Logs can be viewed with the command :
cat /var/log/syslog | grep dhcpdAlso make sure your Ubuntu firewall allows DHCP traffic (ports 67 and 68).
See also: How do I install and configure UFW on Ubuntu 22.04?
FAQs
What is a DHCP server and what is it used for?
A DHCP (Dynamic Host Configuration Protocol) server automatically assigns IP addresses and other network information (such as default gateway and DNS servers) to devices connected to a network.
Why use a DHCP server on Ubuntu?
Using a DHCP server on Ubuntu makes it easier to manage IP addresses on a network, automatically assigning them to devices, reducing manual configuration errors.
How can I check that my DHCP server is working properly?
You can check the operation of your DHCP server by connecting a client device to the network and checking whether an IP address is assigned automatically. Also check DHCP service status via sudo systemctl status isc-dhcp-server.
Can the DHCP server manage multiple subnets?
Yes, the DHCP ISC server can manage multiple subnets. You need to configure each subnet separately in the dhcpd.conf file.
Conclusion
In short, setting up a DHCP server on Ubuntu 22.04 is a simple and essential process for efficient IP address management on a network. Following the steps in this guide, you’ll be able to install, configure and manage a DHCP server, making it easier to connect and organize your network.