UFW, or “Uncomplicated Firewall”, is a simplified firewall management tool for Ubuntu and other Linux distributions. It offers a more intuitive interface for managing netfilter, Linux’s built-in firewall tool. Here’s how to install and configure UFW on Ubuntu 22.04.
Step 1: Install UFW
It is always advisable to update the package list before installing new software. This ensures that you get the latest version available.
Run the following command:
sudo apt updateUFW is already installed by default on most Ubuntu versions. If this is your case, go straight to configuration.
Once the package list update is complete, install UFW using the following command:
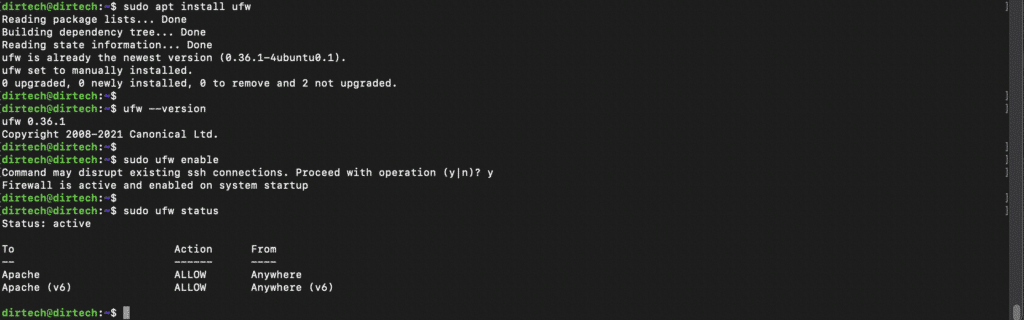
sudo apt install ufwTo ensure that UFW has been installed correctly, you can check its version with the command :
ufw --versionStep 2: Activate UFW
Once UFW has been installed, it must be activated to start filtering traffic.
To activate UFW, use the following command:
sudo ufw enableAfter activation, it’s always a good idea to check whether UFW is actually running. To do this, use :
sudo ufw statusThe response should be something like “Status: active”, indicating that the firewall is running.
UFW should then start automatically each time your system boots.
See also: How do I install Wireshark on Ubuntu?
However, to be on the safe side, you can enable the UFW service to be started at boot time:
sudo systemctl enable ufwStep 3: Configuring basic rules
To ensure the security of your server while maintaining its functionality, it is therefore essential to define appropriate rules in UFW.
If you connect to your server via SSH, be sure to enable SSH connections to avoid being locked out of your server.
sudo ufw allow sshIf you’re hosting a website or web application, allow both HTTP and HTTPS traffic.
sudo ufw allow http
sudo ufw allow https
Sometimes, you may need to authorize a specific port for a service or application. For example, to authorize port 8080 :
sudo ufw allow 8080/tcpIf you wish to explicitly block a port, use the following command (for example, to block port 3000):
sudo ufw deny 3000/tcpTo allow traffic on a port range (for example, for passive FTP), you can use :
sudo ufw allow 60000:60100/tcpTo protect against brute-force attacks, you can limit the number of connection attempts for a specific service. For example, to limit SSH connections :
sudo ufw limit sshStep 4: View firewall rules
To understand and manage your UFW firewall effectively, it’s essential to know how to display the rules currently in place.
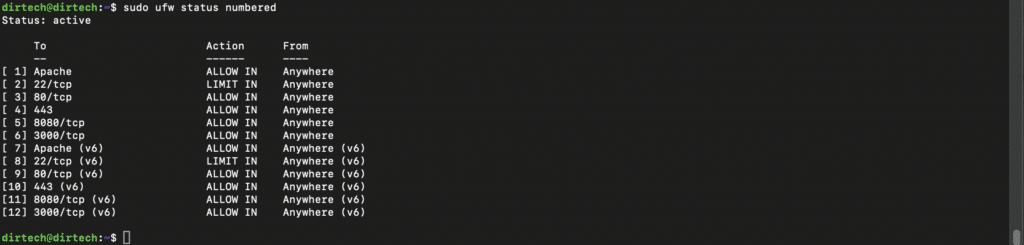
If you wish to display the rules with their associated numbers (which is useful if you plan to delete or modify a specific rule), use the following command:
sudo ufw status numberedYou’ll get a result:
For a detailed view of rules, including protocols and port ranges, run :
sudo ufw show addedThe result:

Default rules determine how UFW handles connections that don’t match any specific rule. To view the default rules, use :
sudo ufw show rawIf you just want to see the currently active rules and their status, run :
sudo ufw statusBy knowing these commands and checking your rules regularly, you can ensure that your firewall is configured as you want it to be, and that it’s protecting your system effectively.
Step 5: Rules management
UFW’s flexibility lies in its ability to handle complex rules with ease. Here’s how to add, delete and modify rules to tailor UFW to your specific needs:
To authorize traffic on a specific port (for example, port 22 for SSH) :
sudo ufw allow 22If you know the rule number (obtained from sudo ufw status numbered) :
sudo ufw delete [numéro]To delete a rule based on the same criteria as when it was added :
sudo ufw deny 22Allow traffic from a specific IP address (e.g. 192.168.1.100):
sudo ufw allow from 192.168.1.100To authorize traffic to a specific IP address on a specific port :
sudo ufw allow to 192.168.1.100 port 22Step 6: Advanced configuration
UFW also offers a series of advanced options that allow you to further fine-tune your configuration. Here are some of these advanced options and how to use them:
To allow traffic from a specific subnet (for example, 192.168.2.0/24) :
sudo ufw allow from 192.168.2.0/24To authorize traffic on a specific interface (for example, eth0):
sudo ufw allow in on eth0 to any port 80Activate logging with :
sudo ufw logging onTo disable logging :
sudo ufw logging offUFW logs all blocked connections by default, which can be useful for diagnosing why certain connections are not allowed.
You can define default UFW behaviors for incoming and outgoing connections. For example, to block all incoming connections and allow all outgoing connections by default :
sudo ufw default deny incoming
sudo ufw default allow outgoing
If at some point you need to disable your firewall (for troubleshooting, for example), you can do so with :
sudo ufw disableTo list applications :
sudo ufw app listYou will have :

To check whether IPv6 works perfectly with UFW or not. To do this, open the UFW configuration file in the “nano” editor:
sudo nano /etc/default/ufwHere’s an example:
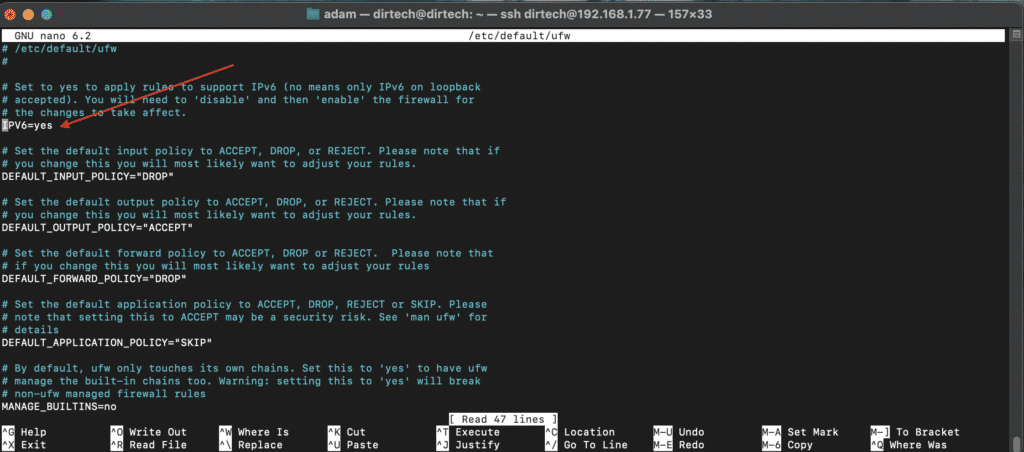
After making the necessary changes, restart UFW by executing the following command:
sudo systemctl restart ufwStep 7: Use UFW’s graphical user interface (GUI)
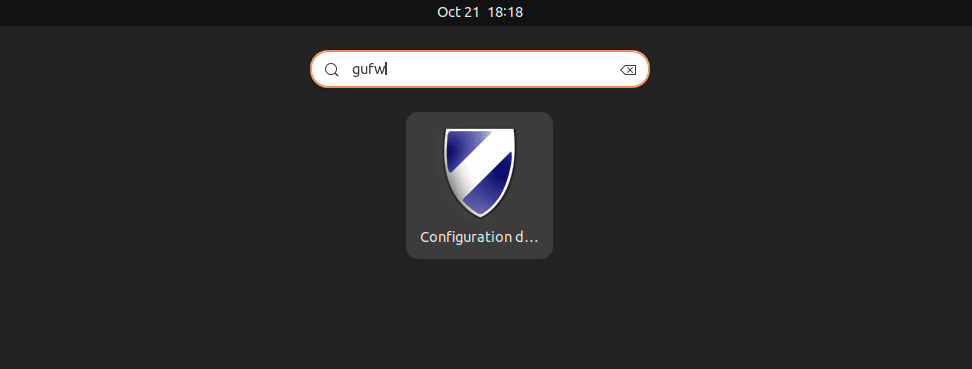
For users who prefer a visual approach to managing their firewall, Ubuntu offers a graphical interface for UFW, called GUFW. This step will guide you through installation and operation:
Open the terminal and type the following command to install GUFW :
sudo apt-get install gufwOnce installation is complete, search for “gufw” in your system menu or type gufw in the terminal to launch it.
The GUFW main window appears. You’ll see options for enabling/disabling the firewall, as well as for adding, modifying or deleting rules.
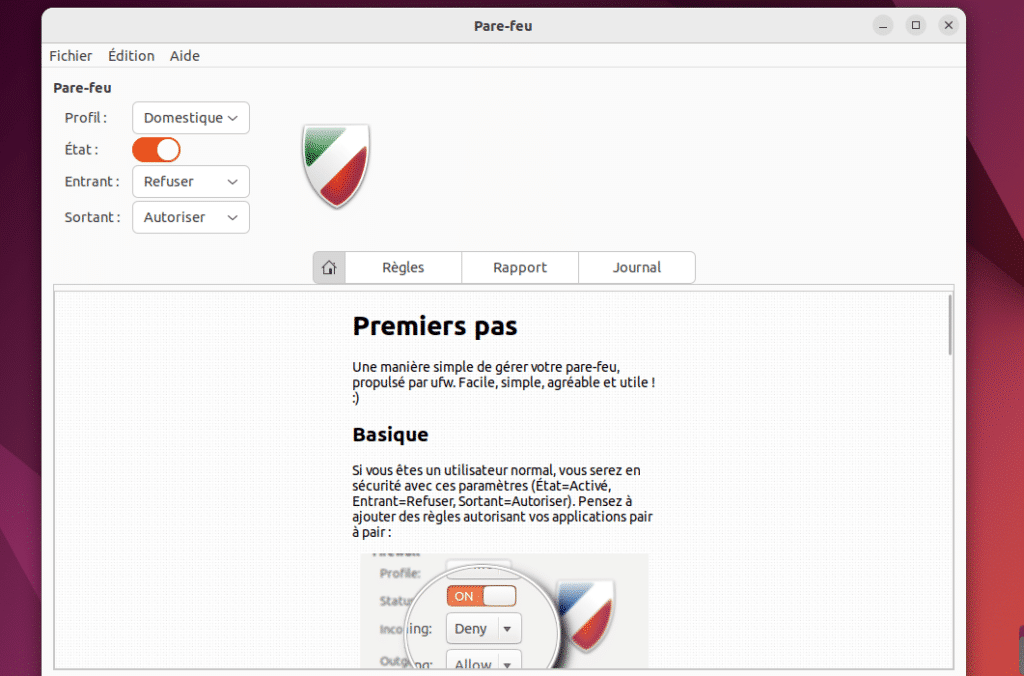
Using GUFW makes managing your UFW firewall much easier, especially for those less familiar with the command line.
Conclusion
UFW is a powerful yet simple tool for managing firewall rules on Ubuntu. By following these steps, you should be able to install and configure the basics of UFW on Ubuntu 22.04. Make sure you always test your rules to guarantee the security and functionality of your system.
Are you interested in this tutorial and would like professional assistance on other subjects? So don’t hesitate to contact me on Upwork. I’ll be happy to help you.
FAQs
What is UFW?
UFW (Uncomplicated Firewall) is a user-friendly firewall for uninitiated Ubuntu users. It offers a simplified interface for managing iptables, Linux’s native firewall tool.
Should I always use GUFW with UFW?
No, GUFW is simply a graphical interface for UFW. You can choose to use either the command line or the graphical user interface, depending on your preference.
How do I disable UFW?
You can disable UFW using the sudo ufw disable command in the terminal.
Does UFW block all connections by default?
When activated for the first time, UFW blocks all incoming connections by default, while allowing all outgoing connections.
How can I authorize a specific service, such as SSH, with UFW?
You can authorize a service using sudo ufw allow ssh or sudo ufw allow 22/tcp.
Does UFW slow down my Internet connection?
No, UFW is simply a rule manager for iptables. It adds no latency to your Internet connection.
How can I see all the active rules in UFW?
You can view all active rules using sudo ufw status verbose.
I’ve added a rule, but it doesn’t seem to work. Why?
Make sure you restart UFW after adding or modifying a rule. Also check that the rule has been correctly defined.
How do I delete a specific rule in UFW?
Use the sudo ufw delete command followed by the rule you wish to delete, for example, sudo ufw delete allow 22/tcp.
Is it safe to use UFW?
UFW is a reliable tool for managing iptables on Ubuntu. However, as with any security tool, it’s essential to keep it up to date and to understand the rules you’re setting up.