Do you dream of running WordPress on Ubuntu locally or online? You’ve come to the right place. Whether for a personal blog, a portfolio or a corporate site, WordPress is one of the best platforms for creating and managing websites. Renowned for its ease of use and flexibility, it powers much of the world’s web. In this guide, we’ll walk you through the steps required to install WordPress on an Ubuntu system.
Installation requirements
Before diving into the process of installing WordPress on Ubuntu! It’s crucial to ensure that certain prerequisites are in place to guarantee a smooth, error-free installation.
Here is a list of essential items to check and configure:
- You must have administrator privileges on the system you’re installing WordPress on, as several steps require superuser permissions.
- A stable Internet connection is required to download WordPress and the necessary packages.
How to install WordPress on Ubuntu ?
Here are the steps to follow to install WordPress on Ubuntu :
Step 1: System update
Before starting, make sure your Ubuntu system is up to date with the following command:
sudo apt update && sudo apt upgradeStep 2: Install Apache, MySQL, PHP and phpMyAdmin
For WordPress to work properly on Ubuntu, it’s essential to install a web server, a database, PHP and, if you wish, phpMyAdmin to manage your databases more easily via a web interface. Good news for you, I’ve already prepared a complete tutorial on installing Apache, MySQL, PHP and phpMyAdmin. Click here to go and read it.
See also: How do I install phpMyAdmin on Ubuntu 22.04?
Follow the tutorial.
You’ll now have the key elements in place to host a website, including WordPress, on your Ubuntu server.
Make sure that everything is correctly configured and working as expected before moving on to the next step, installing WordPress itself.
Step 3: Download and configure WordPress
Now that your system is ready and configured with Apache, MySQL and PHP, the next step is to upload WordPress to your Ubuntu server.
Here’s how to proceed, step by step.
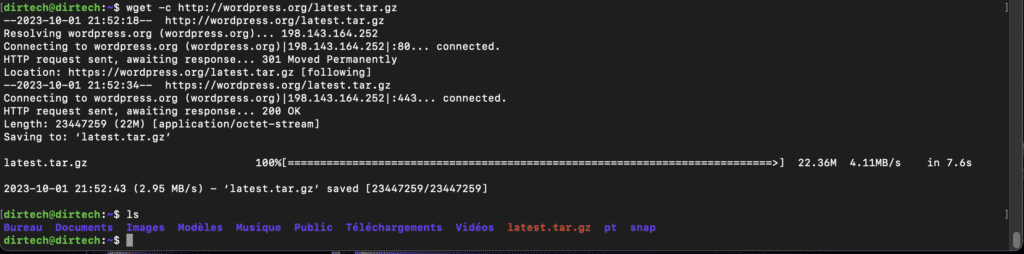
Download WordPress using the wget command, which will download the latest version of WordPress to your system:
wget -c http://wordpress.org/latest.tar.gzThis command downloads the compressed latest.tar.gz file containing the WordPress files.
Extract the downloaded file with the following command:
tar -xzvf latest.tar.gzThis will unzip the latest.tar.gz file and create a new folder called wordpress in the current directory.
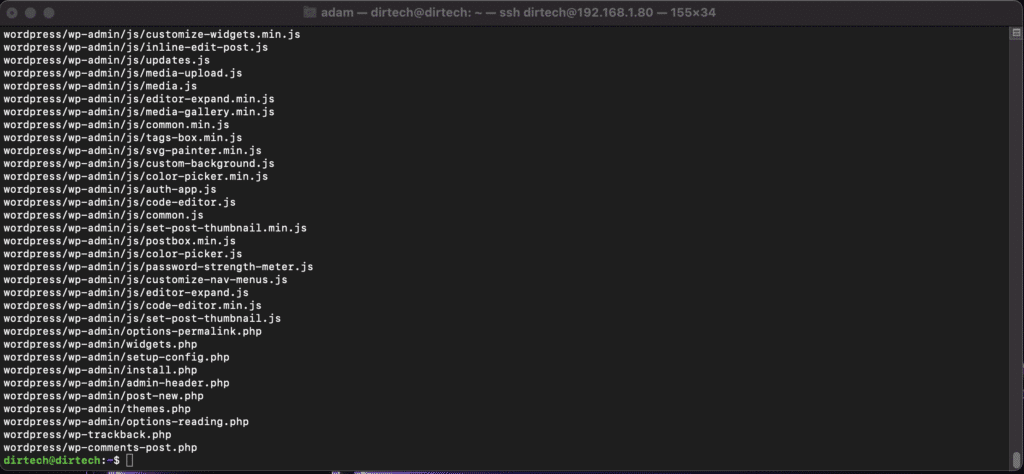
Move the WordPress files to the web server directory :
sudo mv wordpress /var/www/html/This command moves the wordpress folder to /var/www/html/, which is the default Apache root directory on Ubuntu.
Change file permissions so that the web server can access WordPress files and folders:
sudo chown -R www-data:www-data /var/www/html/wordpressThis command assigns ownership of files and folders to the www-data user, which is the default user used by Apache on Ubuntu.
Change the permissions of the WordPress folder to allow correct read and write access:
sudo chmod -R 755 /var/www/html/wordpress/This command modifies the permissions of files and folders in the WordPress folder, allowing the web server to access them correctly.
Create an ‘uploads’ folder to store files uploaded to your WordPress site:
sudo mkdir /var/www/html/wordpress/wp-content/uploadsThis command creates an uploads folder in the wp-content directory of your WordPress installation.
Change the permissions of the ‘uploads’ folder to allow the web server to access and write to it:
sudo chown -R www-data:www-data /var/www/html/wordpress/wp-content/uploadsThis command assigns ownership of the uploads folder to the www-data user, ensuring that the web server can correctly read and write to this folder.
Step 4: Creating a database from phpMyAdmin for WordPress
Once you’ve set up your server and downloaded WordPress, the next crucial step is to create a database for your WordPress site.
Using phpMyAdmin is one of the simplest and most straightforward ways of accomplishing this task.
Here’s how to proceed:
Accessing phpMyAdmin
Open your web browser : Launch your favorite web browser.
Access phpMyAdmin:
In the address bar, type http://votre_adresse_ip/phpmyadmin and press Enter.
Replace “your_ip_address” with the IP address of your server.
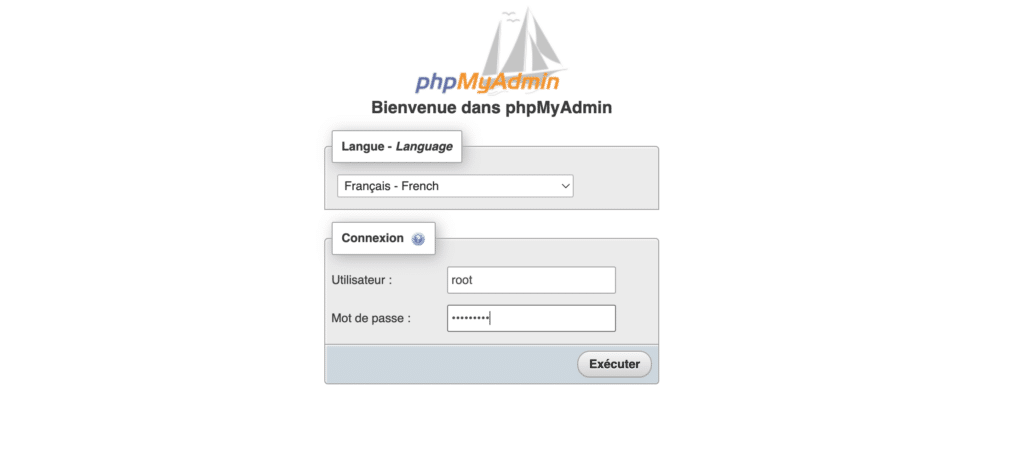
You will see the phpMyAdmin login screen.
Enter the username and password you configured when installing phpMyAdmin, then click on ‘Go’ or ‘Run’.
Database creation
Go to the Databases tab: Click on the ‘Databases’ tab at the top of the page.
Enter the database name: In the ‘Create database’ field, type the name you’d like to give to your WordPress database.
For example, ‘wordpress’.
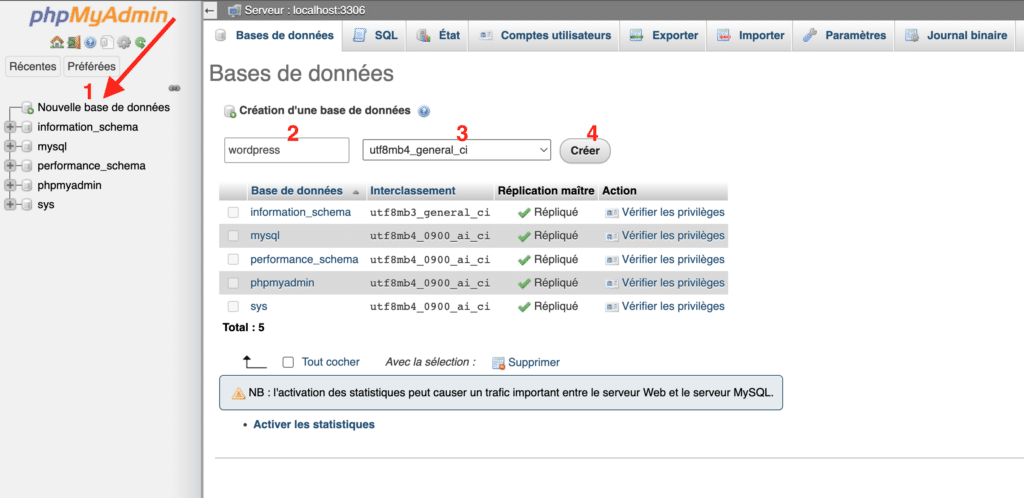
Create the database: Click on the ‘Create’ button.
Assigning a user to the database
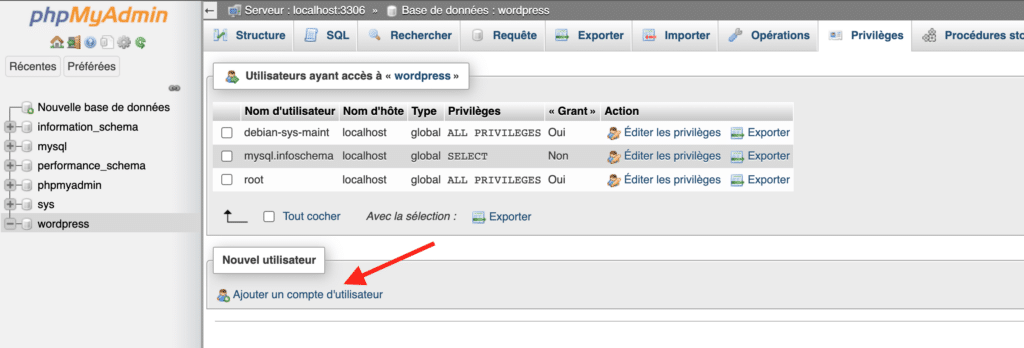
Go to the Privileges tab: Click on the ‘Privileges’ tab at the top of the page.

Add a new user: Click on ‘Add a new user’.
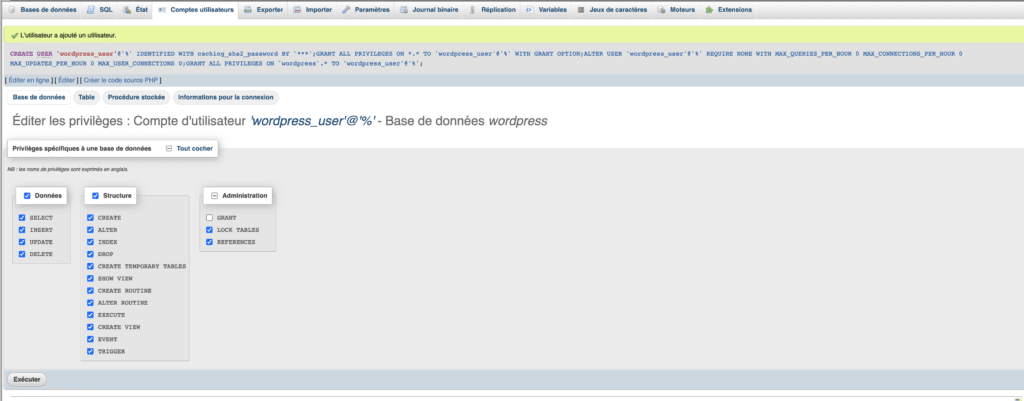
Configure the user: Enter a username, password and configure privileges as required. Make sure you assign all privileges to this user for the database you have just created.
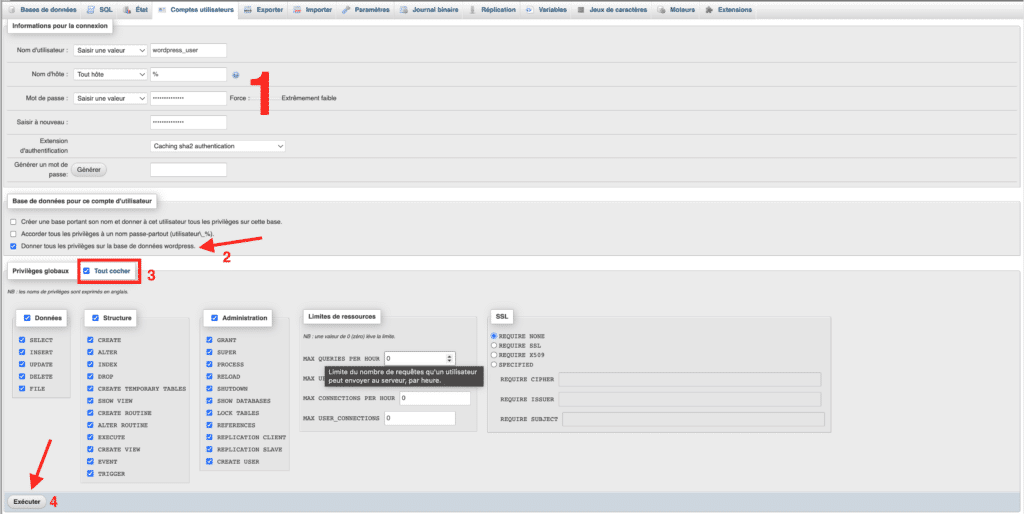
Save changes: Click on Execute.
Step 5: Configure Apache for WordPress
To make your WordPress site accessible, you need to configure the Apache web server to serve your WordPress site.
Follow the steps below to configure Apache for WordPress on Ubuntu.
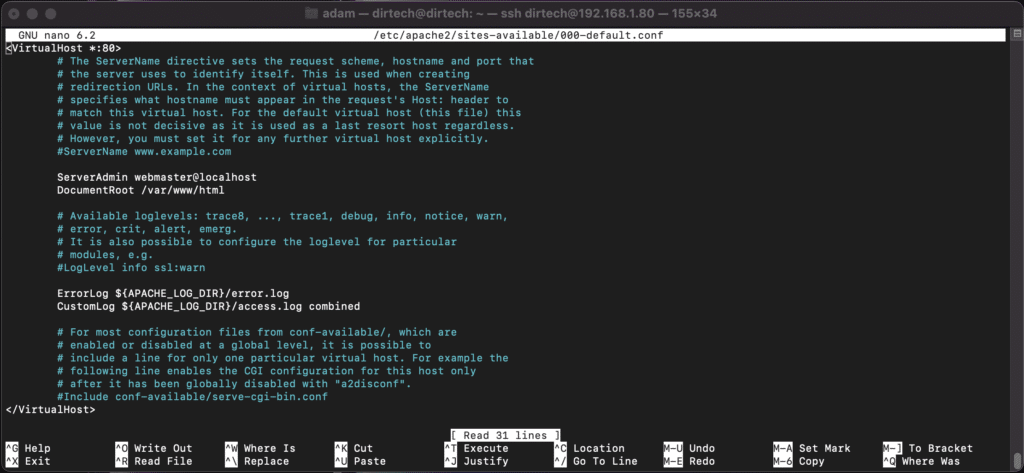
Edit the Apache configuration file: Use the text editor of your choice to open the Apache configuration file. You can use the following command to open the file in the nano editor:
sudo nano /etc/apache2/sites-available/000-default.confModify VirtualHost parameters: In the open file, locate the section and modify the parameters to match the following:
ServerAdmin webmaster@localhost
DocumentRoot /var/www/html/wordpress
Make sure the DocumentRoot points to the folder where WordPress is installed.
Save and close the file: Once you’ve made your changes, save and close the file by pressing CTRL + X, then Y to confirm changes, then Enter to exit.
Activate the new configuration: For the changes to take effect, restart Apache by executing the following command:
sudo systemctl restart apache2Test your configuration: Open your web browser and enter the IP address /wordpress (Example: http://192.168.1.80/wordpress) of your server in the address bar.

You should see the WordPress installation page appear, confirming that the Apache configuration is correct.
Step 6: Install WordPress
Now that you’ve got everything set up, it’s time to activate and launch your WordPress site. Follow these simple instructions to complete the WordPress installation and launch your site.
Select language: Once on the installation page, select the language in which you’d like to install WordPress, then click ‘Continue’.

Click on Let’s go
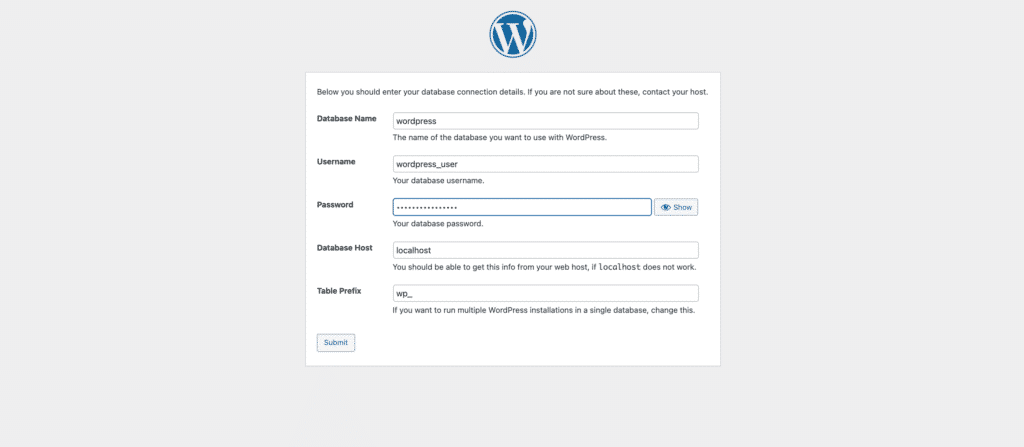
Enter database information: On the next page, enter the database name, username and password you created in phpMyAdmin.
Click on Send to continue.
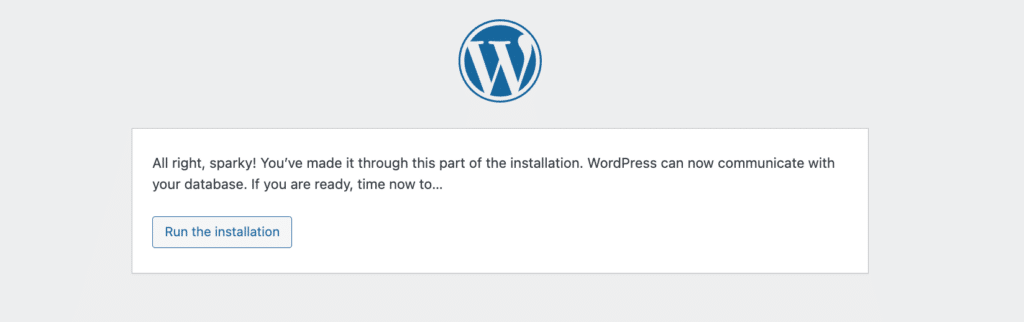
Click on the Start installation button on the next page.
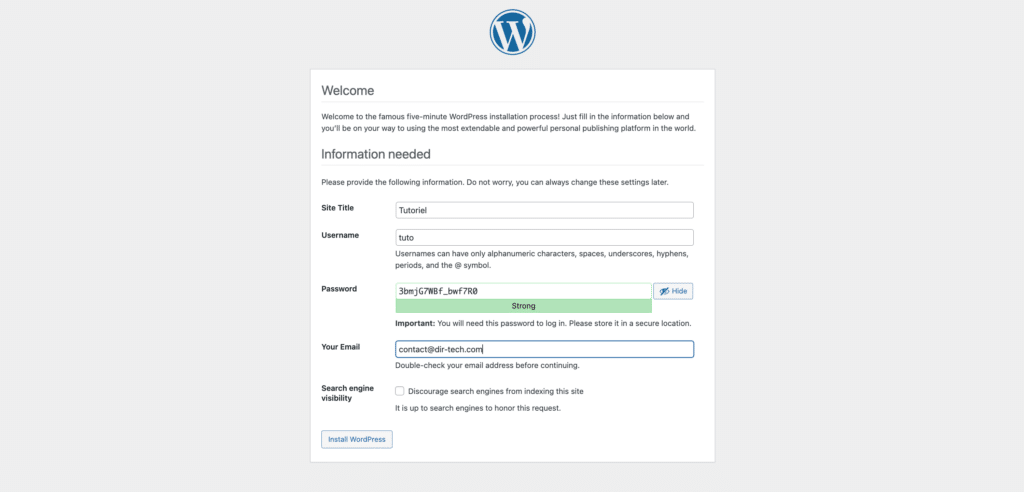
Enter your site title, username, password and the e-mail address you’d like to use to manage your WordPress site.
Click on Install WordPress. Installation will be automatic.
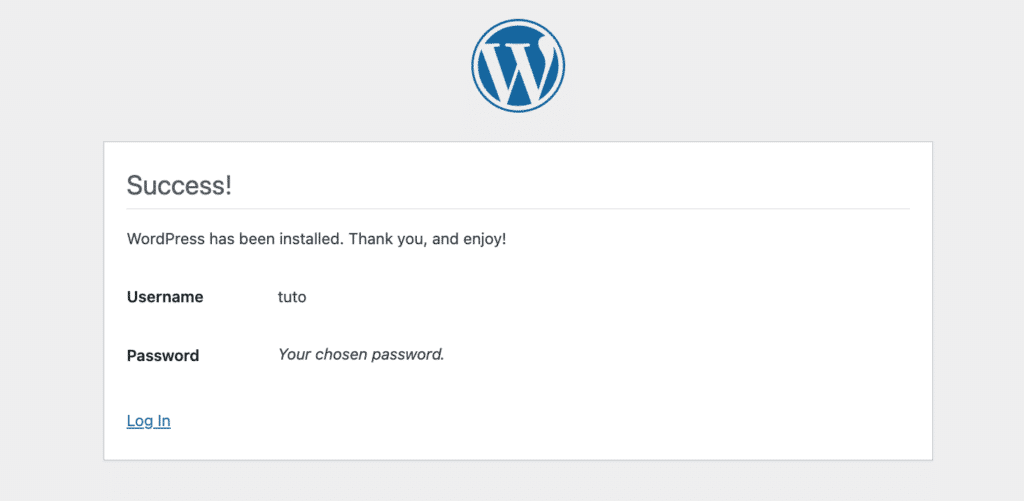
Access the WordPress login page: Once the installation is complete, click on the Login link to access the WordPress login page.

Log in : Enter the username and password you defined during installation and click Login.

Congratulations, you’ve successfully installed WordPress on your Ubuntu server! Now you can start creating and customizing your website using all the powerful features WordPress has to offer.
So you’ve found this article useful and would like to find out more or get professional assistance on other subjects? So don’t hesitate to hire me on Upwork. I’ll be happy to help you.
FAQs
Is it difficult to install WordPress on Ubuntu ?
No, if you follow the steps correctly and carefully, the process of installing WordPress on Ubuntu is pretty straightforward.
What are the advantages of using Ubuntu to host WordPress ?
Ubuntu is a stable, secure and high-performance operating system. It requires fewer system resources than other operating systems, which can help your WordPress site load faster and run more efficiently.
Can I install other software on my Ubuntu server with WordPress ?
Absolutely, you can install any Ubuntu-compatible software on your server, but make sure it doesn’t cause conflicts with WordPress or other software you’ve already installed.
How can I secure my WordPress site on Ubuntu ?
Make sure you keep Ubuntu and WordPress up to date, use strong passwords, limit login attempts, and consider using WordPress security plugins and firewalls to improve your site’s security.
What should I do if I encounter problems during installation?
You can search for your problem on the WordPress or Ubuntu support forums, where the active community might be able to help you solve the problem you’re experiencing.
Can I migrate my existing WordPress site to Ubuntu ?
Yes, you can migrate your existing WordPress site to an Ubuntu server. Be sure to back up your website before migration, and follow the appropriate migration instructions.
I used this guide and it worked. But I am noiw having a very hard time finding out ho to increase my upload_max_filesize. please help me.
Here is tutorial about it : https://www.dir-tech.com/en/increase-the-size-limit-for-php-uploads-on-ubuntu/
Let me know if you have any others questions !