The Zabbix agent is a program that runs on remote machines and collects data for the Zabbix server. To monitor server resources and applications, it is essential to install the Zabbix agent on the server. In this article, we’ll look at how to install and configure the Zabbix agent on Ubuntu 22.04.
Step 1: Update the system
Before proceeding with installation, it is always advisable to update your system.
sudo apt update && sudo apt upgradeStep 2: Add the Zabbix repository
To benefit from the most recent and stable versions of Zabbix, it is essential to include the official Zabbix repository in your list of package sources. Follow the steps below to do so.
Use the wget command to download the package corresponding to the version of Zabbix you wish to install:
wget https://repo.zabbix.com/zabbix/6.4/ubuntu/pool/main/z/zabbix-release/zabbix-release_6.4-1+ubuntu22.04_all.debAfter downloading the package, you need to install it. This will add the Zabbix repository to your list of package sources:
sudo dpkg -i zabbix-release_6.4-1+ubuntu22.04_all.debNow that you’ve added the repository, you need to update the list of available packages. This will allow your system to recognize new packages from the Zabbix repository:
sudo apt updateSee also: How do I install Zabbix Server on Ubuntu 22.04?
Step 3: Install the Zabbix agent
Now that you’ve added the official Zabbix repository, install the Zabbix agent on your Ubuntu 22.04 system.
To install the Zabbix agent, use the following command:
sudo apt install zabbix-agentAfter installation, you can check that the Zabbix agent is working correctly by using the command :
systemctl status zabbix-agentWe recommend configuring the Zabbix agent to start automatically each time the system is booted.
To do this, run the following command:
sudo systemctl enable zabbix-agentStep 4: Configuring the Zabbix agent
Once the Zabbix agent has been installed, it must be configured to communicate correctly with the Zabbix server.
Follow the steps below to configure the Zabbix agent on Ubuntu 22.04.
Open the Zabbix agent configuration file using your favorite text editor.
You can use nano or vim for this task.
sudo nano /etc/zabbix/zabbix_agentd.confIn the configuration file, you’ll need to adjust some key parameters to enable communication with the Zabbix server. Current modifications include :
Server: IP address or host name of your Zabbix server. This is usually the IP address of the machine where the Zabbix server is located:
Server=ip_server_zabbixServerActive: IP address or host name of the active Zabbix server:
ServerActive=ip_server_zabbixHostname: This is the hostname of the agent machine. You can leave it at the default value or set it explicitly.
Hostname=Zabbix serverAfter making the necessary changes, save the file and exit the editor.
For the changes to take effect, restart the Zabbix agent service using the command :
sudo systemctl restart zabbix-agentYou can check whether the Zabbix agent is communicating correctly with the server by consulting the agent logs:
sudo journalctl -u zabbix-agentIf everything is configured correctly, you should see messages indicating that the agent is communicating with the server without errors.
Step 5: Configure the firewall
Security is paramount, especially when you’re listening in on network services.
The Zabbix agent uses port 10050 by default to communicate with the server.
If you have a firewall running on your Ubuntu system (such as UFW), it’s important to allow it to communicate via this port.
Before configuring firewall rules, check that UFW is enabled.
sudo ufw statusIf the firewall is inactive, you can choose to activate it after configuring the necessary rules.
To allow incoming traffic on port 10050, use the following command:
sudo ufw allow 10050/tcpTo ensure that all changes take effect, restart the agent service:
sudo systemctl restart zabbix-agentStep 6: Add the Zabbix client to the Zabbix server
Once the Zabbix agent has been correctly installed and configured on your Ubuntu 22.04 machine, it’s essential to add this client to your Zabbix server so that it can be monitored.
Here’s how to do it:
Open your browser and enter the URL of your Zabbix server. Then log in.
In the top menu, click on “Data collection”, then on “Hosts”.
Click on the “Create host” button in the top right-hand corner.
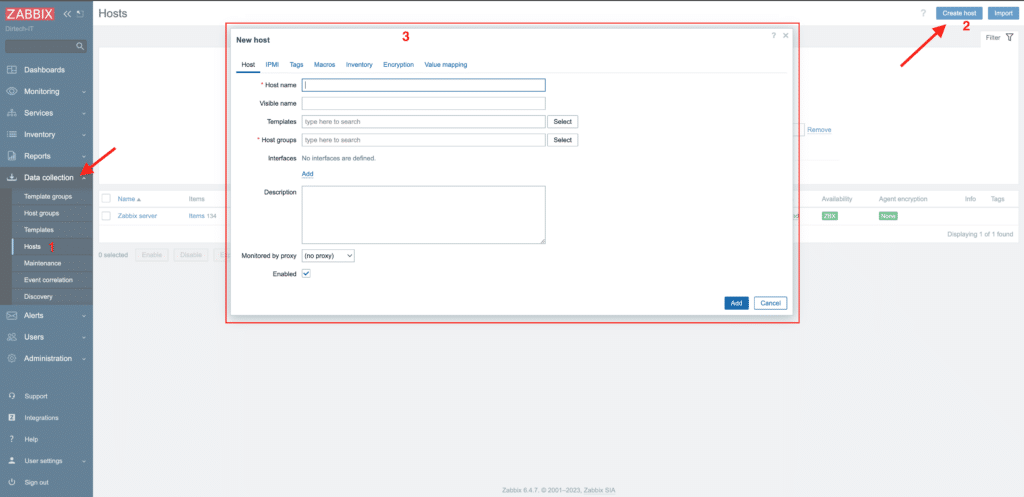
Configure host details :
- Host name: Enter a name for your client machine (for example, “Client_Ubuntu_22.04”).
- IP address: Enter your client’s IP address.
- Host groups : Select or create a group for your customer.
- Agent interfaces: check that the port is 10050 if you’re using the default port.
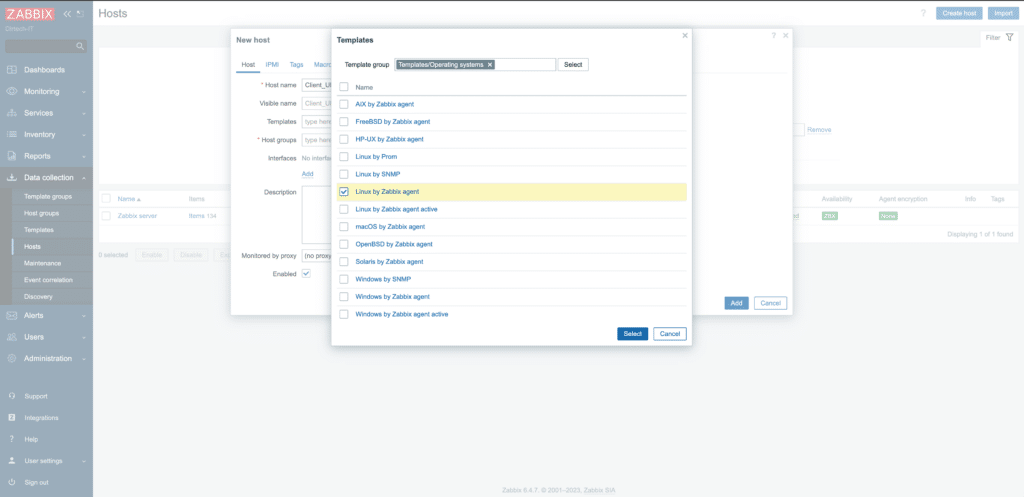
In the “Templates” tab, click on “Add” and find the “Template Operating systems” template. Select it and add it to the list of linked models.
Also select the host group.

Then click on “add” and add the IP address of the agent (client).
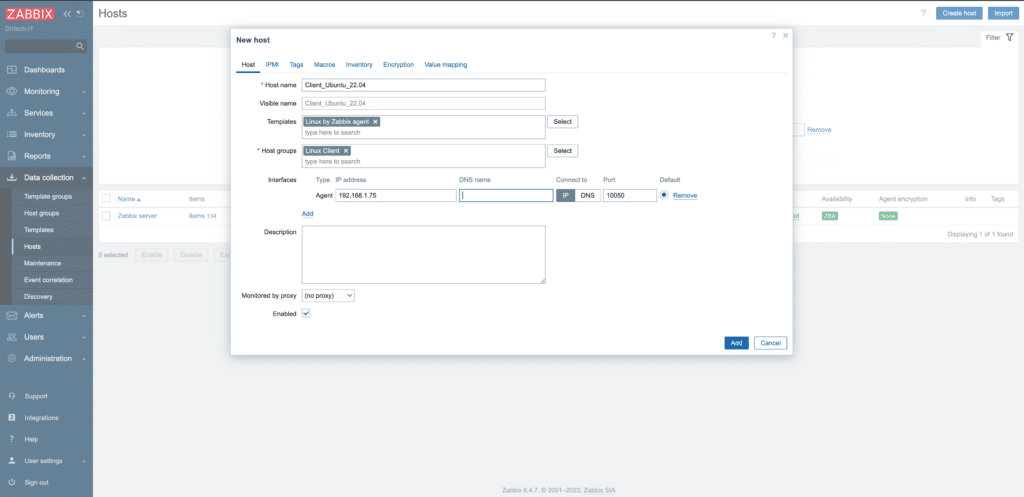
Click on the “Add” button at the bottom to register your host.
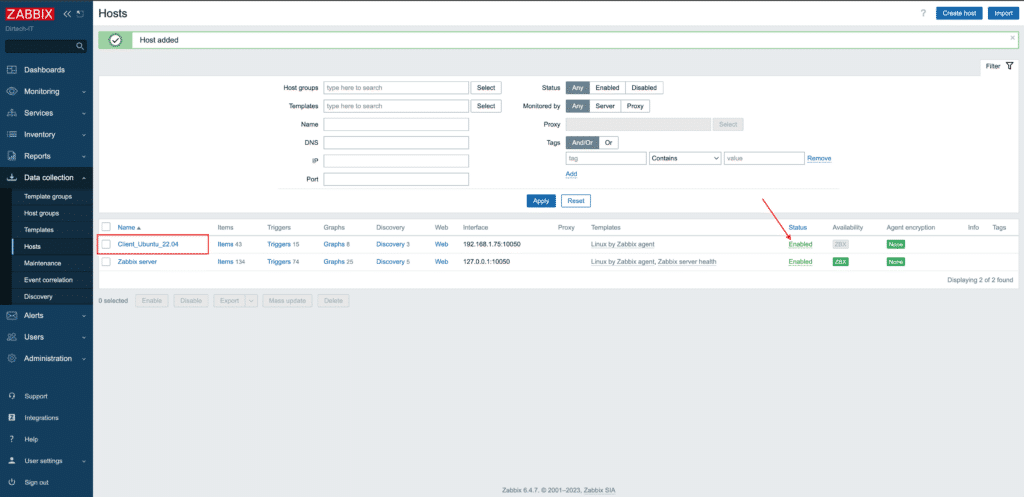
Once these steps have been completed, the Zabbix server will start collecting data from your Ubuntu 22.04 client via the Zabbix agent.
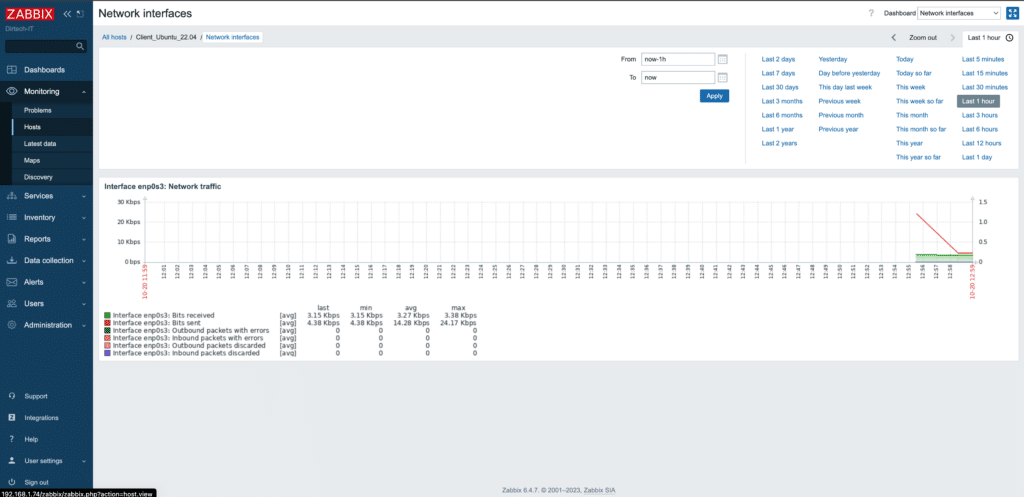
You may have to wait a few minutes before seeing the first data displayed in the Zabbix web interface.
Conclusion
You have now installed and configured the Zabbix agent on Ubuntu 22.04. Your machine is now ready to be monitored by the Zabbix server. Be sure to add this host to the Zabbix server interface to start monitoring.
You liked this article and would like to deepen your knowledge or obtain professional expertise in IT? I invite you to contact me on Upwork. It will be a pleasure to assist you.
FAQs
What is the Zabbix agent?
The Zabbix agent is a program installed on a target machine to monitor various system parameters and applications. It collects data such as CPU, memory, disk and network usage, and sends it to the Zabbix server for analysis and visualization.
Do I need to install an agent on every machine I want to monitor with Zabbix?
Yes, for detailed and comprehensive monitoring, we recommend installing a Zabbix agent on each machine. However, Zabbix also offers agent-free monitoring methods for certain scenarios.
Can the Zabbix agent run on other operating systems in addition to Ubuntu?
Absolutely. The Zabbix agent is available for a variety of operating systems, including other Linux distributions, Windows, macOS, and more.
How can I secure communication between the agent and the Zabbix server?
You can configure the agent and server to use a TLS-encrypted connection. This ensures that data transmitted between the agent and the server is secure.
My Zabbix agent does not communicate with the server. How can I help?
Make sure your system firewall allows traffic on the port used by the Zabbix agent (by default, port 10050). Also check the agent configuration to make sure it’s pointing to the right server with the right configuration.
Can I monitor several services and applications with Zabbix?
Yes, Zabbix is extremely flexible and can monitor a multitude of services, applications and system parameters. You can use predefined templates or create your own to monitor specific applications.