In a world where Ubuntu is mainly used as a server operating system. It is sometimes necessary to have a graphical interface that facilitates the management and manipulation of the server’s various functions. In this article, we’ll cover the essential steps for installing a graphical user interface (GUI) on an Ubuntu server.
Requirements
Before diving headfirst into the installation of a graphical environment on your Ubuntu server. It’s important to make sure you’ve met certain prerequisites.
Here’s what you need to prepare:
- Server running Ubuntu. Make sure you have a server running a supported version of Ubuntu. Ubuntu 20.04 LTS or higher.
- Stable Internet connection: A reliable connection is essential to download the necessary packages without interruption.
- Root access or sudo privileges: You’ll need administrator privileges to install packages and configure the system.
- Terminal or command line interface: Although our aim is to install a GUI, we’ll be starting the process via the command line, so make sure you have access to it.
- Backing up your data : Before making any major changes to your system, we always recommend backing up your important data to prevent accidental loss.
Choice of graphic environment
Now that we have the prerequisites, the next step is to choose the graphics environment that best suits your needs and preferences.
Ubuntu supports several graphics environments, each with its own advantages and disadvantages. Here’s an overview of the most popular options:
GNOME
- Advantages: This is Ubuntu’s default environment, offering a consistent user experience and a large support community.
- Disadvantages: Can be heavier in terms of resource consumption than other environments.
KDE
- Benefits: Known for its visual beauty and rich range of features, it offers deep customization and impressive graphic effects.
- Disadvantages: Rich functionality can make it a bit resource-hungry.
XFCE
- Benefits: XFCE is light and fast, making it ideal for systems with limited resources. It also has a relatively low learning curve.
- Disadvantages: Less flashy and perhaps considered outdated in terms of design by some users.
LXDE
- Benefits: Like XFCE, it’s designed to be even lighter, making it ideal for older systems or those with limited hardware resources.
- Disadvantages: Offers a more limited range of functions and a more basic appearance than GNOME or KDE.
So, if you’re not sure which environment to choose, you could consider installing several environments and switching between them to test which one suits you best.
Step-by-step GUI installation process on Ubuntu
Step 1: System update
First of all, let’s update our system to make sure we have the latest security updates and patches.
Open your terminal or connect via SSH and run the following commands:
sudo apt update & sudo apt upgradeStep 2: Installing the graphics environment
Once our system is up to date, let’s install the graphical environment. Depending on the environment you have chosen, use one of the following commands:
For GNOME (the environment we have chosen for this tutorial):
sudo apt install ubuntu-desktopKDE :
sudo apt install kubuntu-desktopXFCE :
sudo apt install xfce4For LXDE :
sudo apt install lxdeStep 3: Installing the display server
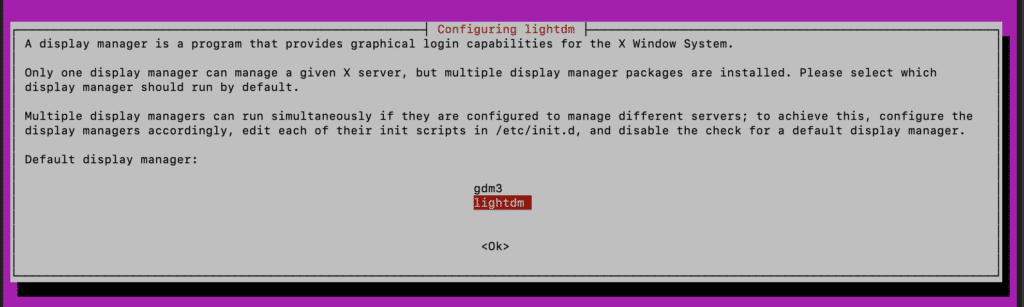
After installing the graphics environment, it’s time to install a display server. In this tutorial, we’ll be using LightDM.
Run the following command:
sudo apt install lightdmDuring installation, you may be asked to choose your default display manager. Select “lightdm”.
Step 4: Starting up the graphical interface
Now that everything’s in place, let’s start the GUI by executing the following command:
sudo systemctl start lightdmYour graphical environment should now launch, allowing you to enjoy a visually pleasing and intuitive user interface.
Restart your server!
Conclusion
Congratulations! By following this guide, you have not only chosen, but also successfully installed a graphical environment on your Ubuntu server. This step forward marks the beginning of a more intuitive and visually pleasing user experience.
Remember, installing a GUI doesn’t replace the power of the command line; it simply offers a more accessible alternative, especially for new users. You now have the freedom to use the terminal and GUI interchangeably, getting the best out of both worlds.
Annexes
In this section, we’ve put together some additional resources and tips to help you get the most out of your new graphics environment on Ubuntu.
Official documentation
For more detailed information on the different graphical environments and their features, please refer to the official Ubuntu documentation:
- Ubuntu documentation – GNOME
- Documentation Kubuntu – KDE
- Documentation Xubuntu – XFCE
- Documentation Lubuntu – LXDE
Forums and communities
If you encounter problems or have questions, the following forums and communities can be valuable places to find help: